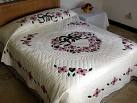
All About Applique
Applique, is a technique that involves the positioning of different layers of fabric on top of the other and sewing them together.
The term, originates from French vocabulary, from the verb appliqués which means 'to put on'. While the appliqué word originates from French, it has been adopted by other languages and cultures to designate the sewing together of materials and themost ancient examples of appliqués date back centuries ago.
Knowing how to successfully create an appliqué design will enable the quilter to gain more experience in this handicraft while representing a good way to practice one's skills. Therefore, the appliqué technique is a flexible and beautiful technique which embellishes designs and makes the quilting art even more special than it seems.
Learning Applique Techniques
When starting to learn applique techniques, you have to select a design. Shapes of different colors and sizes are available, ranging from small, simple ones to more complex designs but the latter are not to be attempted until later. For the beginning, make it simple. Basic forms like circular ones or a heart will be beneficial in your understanding of the primary things with appliqués.
To create a different pattern, you could buy freezer paper because it's not that flexible to be manipulated well but it neither is too thick. Then, sketch your design on the paper and start cutting it according to the pattern. Once you can have traced out the first sightings of the applique;, cut it out but leave some available space around, say half a quarter of an inch.
After that, you need to make sure the applique; is resistant enough and that it won't damage itself. Use some pins to stick the paper to the design then by using pins, you can stabilize them together. Next comes the edges that you left previously in case incidents happened. Layer the materials together, in an ascending order, unlike in traditional quilting, where you sew the materials together in seams and then deal with the remaining edges in a careful way so that they can't be spotted. Use a pair of scissors to level things out and cut along the market line. After that, press the seam under your design. To do this, you could use a Popsicle sticks' tip or just a simple chopstick's tip to level the rash edges of the design and obtain an aesthetically pleasing design.
Finishing Techniques
There are some remaining things for you to do afterwards. Place the design wherever you think it would fit on the fabric and stitch it there. To stitch the appliqué to the fabric, you have several possibilities. If you desire to conceal the stitches form plain view, then use blind or hem stitch that won't be so easily discovered in the fabric. If you desire to keep it all visible, then make your stitches look like decorations, so that the stitches may look like decorations put there on purpose. Any embroidery stitches can be used to decorate your applique; but remember that with more complicated stitches, you need to attach some hem stitches to help you with your work.
Finally, after all this pinning and stitching is done, cut a small opening in the fabric, somewhere behind the appliqué fabrics but remember, be careful not to cut embroidery itself. Afterwards, use your hands to remove the paper you initially used to cut your design. Turn the appliqué on the other side, press it and make some last readjustments to its edges, without spoiling the design in any way, nonetheless. Make sure you've used an embroidery stitch for decoration. This is, in a few words, the technique related to the appliqué. The first steps are more difficult, but once you've become accustomed to the technique, you will be able to advance in your craft.


